

Edit Table
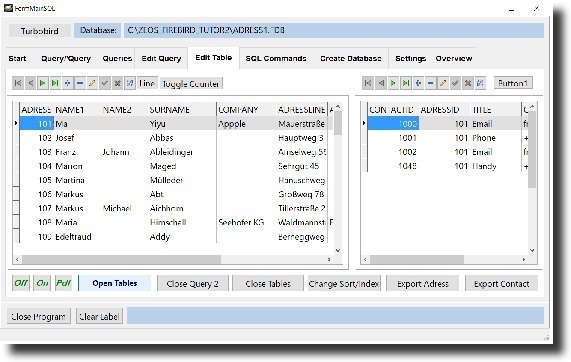
Edit Table shows two DBGrids with tables linked by 2 querys, ZQuery1 and ZQuery2. In a query, the amount of data is determined via a SQL query. For ZQuery1, we have the query "SELECT * FROM ADDRESS" in the property SQL. "ZQuery.SQL: = 'SELECT * FROM ADDRESS';" would therefore be in the program code. SQL is a string list (TStrings), that is, a table with strings (or strings) behind or below each other. freepascal
In the following descriptions for the other examples, the links are no longer explained because the principle is always the same.

The above picture (can be enlarged with clicks) shows the linking of the two queries. In ZQuery1 all addresses are displayed, because the SQL command "SELECT * FROM ADRESS" translates to "Show me all fields of table ADRESS", where "*" stands for "all fields" and there is no further restriction on the data, All addresses will be displayed. This query, whose result is displayed in DBGrid1 (left), only accesses a single table (ADRESS) and therefore the data can be edited.
In the tutorial, the steps below are already done, the description serves to explain the procedure.
In DBGrid2 (right) we want to display the communication data of the respective person of ADRESS. First of all, we need to tell the associated ZQuery2 which data we want to retrieve. We do this by assigning the SQL command "SELECT * FROM CONTACT" to the ZQuery.SQL property. Without further steps DBGrid2 would now display all contact data of all customers. Therefore, we still have to tell ZQuery2 that we only want to see the contact details of the address shown on the left. First, we assign the value ZQuery1 to DataSource1 in DataSet, which can be selected in the Propertylist from a list of existing ZQueries. Then we have to tell ZQuery2 which data should be displayed. We do that in the Propertylist of ZQuery2. There are three properties we need to set.
MasterSource: Here it is set from which table (ADRESS) we get the link. This is done by setting DataSource1, the TDataSource connected to ZQuery1, to MasterSource. This tells ZQuery2 which table the display of the data depends on. Now we have to set which field is responsible for the linkage.
Masterfields: These can be multiple or one field only. For this purpose, the field (s) used in the "master" table may only be (a) unique index field (s), that is, each value may occur only once. In technical terms this is called a primary index. In our example, we use ADDRESSID and CONTACTID (CONTACT) as the primary index and these are automatically generated in the database as a sequential number. If such a sequential number is created as a primary index for each table, working with the database is much easier. The primary index should definitely not be a field that the user works with.
LinkedFields: In this property we also enter "ADDRESSID". However, this is not the ADDRESS ADDRESSID but CONTACT. Whenever a new contact is entered, CONTACT's ADDRESSID field is now automatically assigned the ADDRESS ADDRESSID value. In this way the database knows which contacts to assign to which address. Since we have marked ADRESSID of CONTACT as creating the "Foreign Key" database, it is not possible for this field to contain an ID - in our case number - for which no address exists.
Next, connect DataSource2 to ZQuery2. Last but not least, DataSource1 and DataSource2 each with DBGrid1 and DBGrid2. Now that's it
Scaffolding for data display and processing finished.
We still have a problem. If we insert addresses, the address will be copied to the database, but the new record will not be available for contact data collection. As we write in the database form a small routine, with which we make that possible. At ZQuery1 we click on the three points at the object inspector at "AfterPost". An empty procedure opens and in this we write "QueryRefresh (DataSet as TZQuery);" Refresh means that the data are physically read from the storage medium and are now safely available.
The procedure is by the assumption of the transmitter "DataSet: TDataSet" ffor the execution of the command "QueryRefresh(DataSet as TZQuery);" universal, that means this part of the program could be used for multiple queries.
Unit datamaintutor2, Zeile 179
procedure TDataDMTutor2.ZQuery1AfterPost(DataSet: TDataSet);
begin
// die ausgeklammerten Programmteile habe ich weggelassen
QueryRefresh(DataSet as TZQuery);
end;
Another problem arises when deleting an address. The address can not be deleted until all associated data (with foreign key) has been deleted. That is, we must first delete all associated contact information before we can delete the parent address. Here BeforeDelete of ZQuery1 (ADRESS) offers. Before the address is finally deleted, we can put the deletion process of the contact data here in the unit TDataDMTutor2 (line 200). "for i: = 0 to i-1 do begin" - i-1 because the record numbering starts at 0 and not at 1. Three data sets are therefore indexed at 0.1.2.
procedure TDataDMTutor2.ZQuery1BeforeDelete(DataSet: TDataSet);
var i: integer;
begin
with (DataSet as TZQuery) do begin
DisableControls; // Datenanzeige aus
{ Die Anzahl der Datensätze übernehmen }
i:= ZQuery2.RecordCount; // RecordCount = Anzahl der Datensätze
for i:=0 to i-1 do begin // Datensatzanzahl durchlaufen und löschen
Delete; // einen Datensatz löschen
end;
EnableControls; // Datenazeige ein
end;
end;
At the bottom of the penultimate line are some buttons. First the three for the description.
Open Tables
This button opens ZQuery1 and ZQuery2 and displays the data on the screen.
Close Query 2
Closes Query2 and the data is no longer displayed in the right-hand DBGrid. Is done to show that individual tables can be closed and others remain open.
Close Tables
Close all two queries. With Open Tables they can be opened again.
Change Sort/Index
Changes at the address in each case between the display order by means of index and the adjusted sorting fields. Please refer to the procedure / operation of the source code.
Eport Adress, Export Contact
The data are output to a readable text file for ADRESS or CONTACT using the compo- nent MyExPorter (component TTexExporter). Before the file name is asked.
Above the display of the data we also have some buttons.
Datenbank Navigator
Far left and far right is the navigator for the addresses and contacts. Simply test. As a single button I would like to mention the X. It turns red when data is changed or a new record is created. By clicking on this X, the change / new investment is reversed. This is useful when editing in a non-editable dataset. I deliberately did not block user access to the data for all the examples so that you can see what's possible.
Line
Shows how to display an entire line with the option of changing ADRESS.
Toggle Counter
The ID columns are displayed here by default to demonstrate the operation. Normally, if a user works with the database, the ID columns would not be displayed. The display of the IDs can be switched off here.
Hints to the source code
In the program code there are some things that show different possibilities in programming.
Der Open command for ZQuery1 (Zeile 1896):
ZQuery1.SQL.Clear;
s:= 'SELECT * FROM ADRESS';
ZQuery1.SQL.Add(s);
ZQuery1.IndexFieldNames:= 'ADRESSID Asc';
ZQuery1.Open;
have the same meaning as the SQL for ZQuery2:
sl:= TStringList.Create;
sl.Add('SELECT * FROM CONTACT');
ZQuery2.SQL:= sl;
sl.Free;
where Query1 empties the contents of SQL (Clear), then queries the string "s: = 'SELECT * FROM ADRESS';" is assigned and this is then attached to the content of the (now empty) SQL. Then, the index = order of how the data is displayed (ascending = "asc") is determined. Then the table is opened and displayed.
ZQuery2 creates a StringList, the SQL command "sl.Add ('SELECT * FROM CONTACT');" and assigned to the SQL Property of ZQuery2. Then the stringlist (sl) has to be deleted, otherwise the memory will remain occupied.
A third option is to configure the SQL statements directly in the SQL property. This can be seen from line 1285:
SQL.Clear;
SQL.Add('SELECT');
SQL.Add('ADRESS.SURNAME, ADRESS.NAME1, ADRESS.CITY,');
SQL.Add('CONTACT.CONTACTID, CONTACT.TITLE, CONTACT.CONTENT1, CONTACT.CONTENT2');
SQL.Add('FROM CONTACT');
SQL.Add('INNER JOIN ADRESS ON CONTACT.ADRESSID=ADRESS.ADRESSID');
SQL.Add('WHERE ');
SQL.Add('ADRESS.NAME1 = '+ QuotedStr('Franz'));
// SQL.Add('AND CONTACT.TITLE = '+ QuotedStr('Handy'));
SQL.Add('ORDER BY ADRESS.SURNAME;');
The last option is to place the SQL command directly in the Prorperty SQL, which must be done if you want to access the tables at design time.

In order to keep the display in a DBGrid kompkt, we have further shortened the fields in the display. This happens starting from line 1915, whereby the numbers for the length indication indicate the length in pixels and not in letters.
Furthermore, we look for the field "TITLE" with a repeat until loop to assign him the choice "Phone, Mobile, Email and Skype, starting from line 1976. The advantage of this procedure is that we do not care in the future anymore date You need to know which column in the DBGrid (for example, by changing the SQL query) is assigned to the field "TITLE." Of course, the processing of this part of the program could also be done directly in the loop ;-).
Last but not least we shorten the column display at DBGrid2. Here we make it easy - we just go through all the columns (number of columns = Columns.Count) and set the width to 120 pixels.
Description ZQuery
<>